|
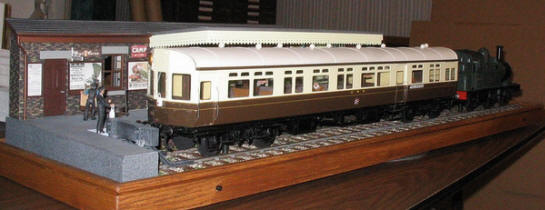
14xx
Class
0-4-2
Tank and Auto Coach featured here, were built quite a few
years ago. They were built in a scale of 10mm
: 1 foot , better
known as , 1/32nd. or Gauge 1
and it was one of four loco and coach sets, built at that time. Three sets were
sold to collectors, and I retained set number four.
About six years ago, the owner of one of these models, unfortunately passed
away, and as I was personally involved in the estate sale of his entire model
collection, I purchased back his 1400 Autocoach set. It needed a new
oak trim, and acrylic cover, but apart from that, it was in excellent condition.
When a
collector expressed an interest in purchasing it, I sold my set number
four, with a view to restoring set number three with a new trim and case, for my
own collection. However ... I decided to do something different
with this last set, by adding a section of the Wallingford station platform to
the model's base. A lot of time went into the research and building
of this station building, but it was also a lot of fun too.
Most of the information was acquired from the OPC publication "Great Western
Branch Line Termini" Volume 1
.. by Paul Karau. The model is mounted on a turntable, allowing
you to rotate it, for all round viewing.
|
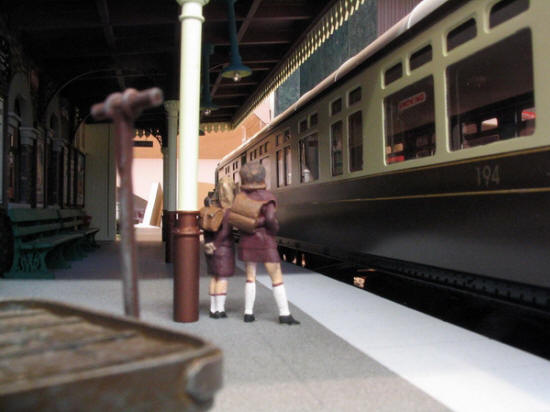
 This is a picture, taken from the buffer stop end of the platform,
showing the porter poised to give the driver his clearance to leave.
Another porter can be seen unloading a crate from the platform trolley,
which like everything on this model, was totally hand built to the
G.W.R. design of that era. Two school girls watch the activity down
the platform. This is a picture, taken from the buffer stop end of the platform,
showing the porter poised to give the driver his clearance to leave.
Another porter can be seen unloading a crate from the platform trolley,
which like everything on this model, was totally hand built to the
G.W.R. design of that era. Two school girls watch the activity down
the platform. |
Wallingford Station Model
Under
normal Autotrain practice, the end of the coach you can see in this
image, becomes the front of the train on it's return journey. Single
branch line operation like the Wallingford line, was a push-pull
system. This train is shown standing at the buffer stop, ready to
leave on it's journey to the other end of the line, and the driver would
be in the locomotive with the fireman, for this trip. On the return
journey, the fireman would stay in the locomotive, but the driver would
come to this end of the coach, and could actually operate the steam
regulator in the engine, at the back, from this position. The regulator lever can
just be seen at the top left of the centre window, and this is connected
by a series of square steel control rods, which run the full length of
the coach to the loco.
You can
also see in the background of this picture, the walls of my den, where
these pictures were taken. In some cases I have removed the
background from the images, so as not to detract from the model, but in
this case I decided to leave it in. It seemed only fitting, that the
photographs on the bookcase of my Mother and Father should be there, as
they were the founders of this company so many year ago, and there major
products at that time, were model railway building, for Bassett-Lowke
Ltd.. |
|
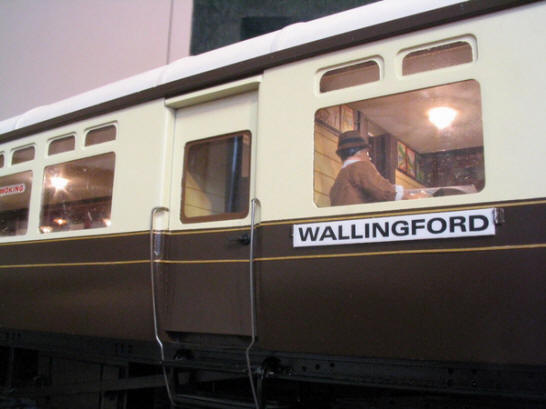
 The number
of the auto coach 194 can be seen in this image also. This model of
the trailer car, faithfully depicts car No. 194, which was actually
based at Wallingford, until about 1947. It is one of a series built by
the G.W.R. at their Swindon works, to diagram A30, Lot 1480.
The number
of the auto coach 194 can be seen in this image also. This model of
the trailer car, faithfully depicts car No. 194, which was actually
based at Wallingford, until about 1947. It is one of a series built by
the G.W.R. at their Swindon works, to diagram A30, Lot 1480. |
 A smart
man, dressed in typical late 30's fashion, and obviously in no hurry to
board the train. The timetable on the station building wall, is an
actual copy of a Wallingford Branch timetable of that time, as are the
other travel posters etc. depicted throughout the model.
A smart
man, dressed in typical late 30's fashion, and obviously in no hurry to
board the train. The timetable on the station building wall, is an
actual copy of a Wallingford Branch timetable of that time, as are the
other travel posters etc. depicted throughout the model. |
|
 This
picture, taken of course from the outside of the coach looking in, at
the illuminated interior. You can see the natural wood walls, and the
advertising posters on the upper part of the screen wall.
This
picture, taken of course from the outside of the coach looking in, at
the illuminated interior. You can see the natural wood walls, and the
advertising posters on the upper part of the screen wall. |
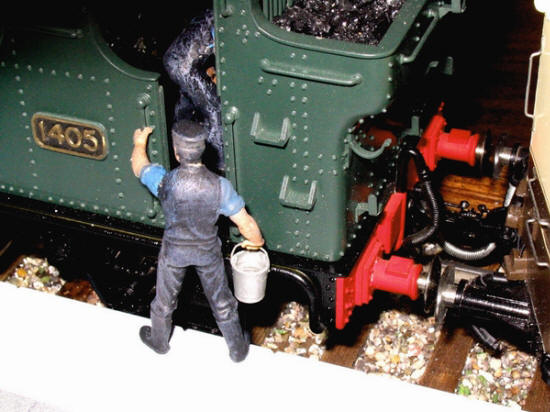
 Inside the
cab of the locomotive, showing the fireman shoveling coal through the
open firebox door. The warm glow from the illuminated inside of the
firebox can be clearly seen in this picture. The real coal in the
bunker was actually imported from Great Britain. Part of our model
supplies brought with us when we came to Canada, but never the less ....
actual English coal.
Inside the
cab of the locomotive, showing the fireman shoveling coal through the
open firebox door. The warm glow from the illuminated inside of the
firebox can be clearly seen in this picture. The real coal in the
bunker was actually imported from Great Britain. Part of our model
supplies brought with us when we came to Canada, but never the less ....
actual English coal. |
|
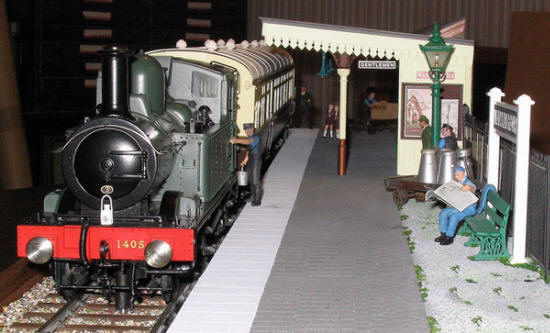
 An overview
of the name board end of the platform, showing our serviceman passenger
on the seat. The porter unloading the milk churns, and the old
gentleman arriving, are also in good view. This image also gives you
a great view of the top of the engine, and the rivet detail on it's side
tanks. Incidentally, on these models, each one of those rivets were
applied individually. They are not a rivet of course, they are very
tiny domes, glued to the surface of the plexiglas side panels before
painting. This same technique was used on the coach ends and buffer
beams also. An overview
of the name board end of the platform, showing our serviceman passenger
on the seat. The porter unloading the milk churns, and the old
gentleman arriving, are also in good view. This image also gives you
a great view of the top of the engine, and the rivet detail on it's side
tanks. Incidentally, on these models, each one of those rivets were
applied individually. They are not a rivet of course, they are very
tiny domes, glued to the surface of the plexiglas side panels before
painting. This same technique was used on the coach ends and buffer
beams also. |
 A close
shot of the driver and engine rivet detail. This image also shows the
couplings and brake vacuum pipe detail between the loco and coach.
However, it does not show very clearly, the regulator coupling link
that extend from under the two buffer beams of each vehicle.
Unfortunately its being hidden by the two buffers in the foreground.
A close
shot of the driver and engine rivet detail. This image also shows the
couplings and brake vacuum pipe detail between the loco and coach.
However, it does not show very clearly, the regulator coupling link
that extend from under the two buffer beams of each vehicle.
Unfortunately its being hidden by the two buffers in the foreground. |
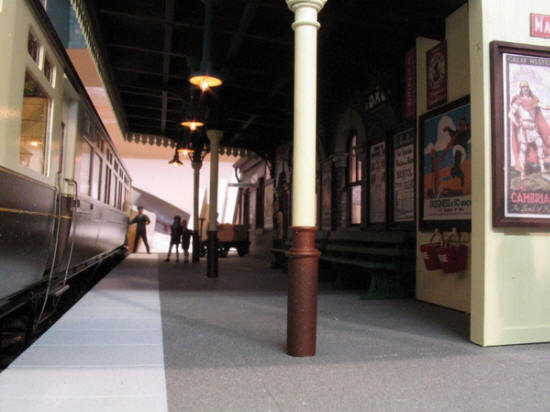 Looking down the platform with the station lights and the coach lights
on, really gives you a sense of realism, and scale. I
think taking photographs like these, at eye level is as much fun as
building the model itself.
Looking down the platform with the station lights and the coach lights
on, really gives you a sense of realism, and scale. I
think taking photographs like these, at eye level is as much fun as
building the model itself. |
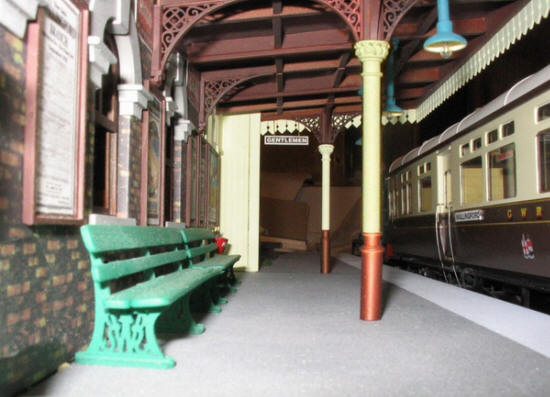 A good
picture of the simulated wrought iron scroll work on the canopy support
brackets. This pattern is an authentic G.W.R. design, as are the
support posts. The stonework over the windows simulates the actual
architectural design on the Wallingford station building, taken from
early photographs. The platform seats were cast iron frets, again, a
G.W.R. design, with painted wood slats. and the model shows these in
accurate detail.
A good
picture of the simulated wrought iron scroll work on the canopy support
brackets. This pattern is an authentic G.W.R. design, as are the
support posts. The stonework over the windows simulates the actual
architectural design on the Wallingford station building, taken from
early photographs. The platform seats were cast iron frets, again, a
G.W.R. design, with painted wood slats. and the model shows these in
accurate detail. |
|
 The Stationmaster's office shows a rather old looking desk and some
untidy files. Of interest is the picture on the wall, which is a
miniature copy of an actual photograph of the Wallingford station staff
of that time. It surprised me that the staff was so large .... 16 of
them ... for such a small station, but it does include engine drivers
and fireman too. A discarded copy of the times is in the waste
basket, and a bulletin board with all sorts of various notes can be seen
almost out of camera on the left wall.
The Stationmaster's office shows a rather old looking desk and some
untidy files. Of interest is the picture on the wall, which is a
miniature copy of an actual photograph of the Wallingford station staff
of that time. It surprised me that the staff was so large .... 16 of
them ... for such a small station, but it does include engine drivers
and fireman too. A discarded copy of the times is in the waste
basket, and a bulletin board with all sorts of various notes can be seen
almost out of camera on the left wall. |
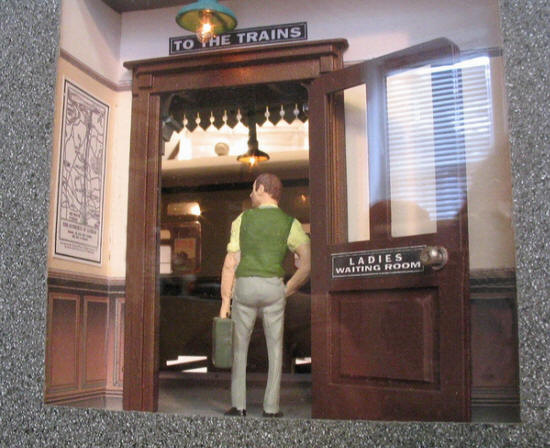 To have included the complete station building width in this model,
would have made it too large, so I have just featured the first few feet
of the station. This picture shows the main building entrance to the
platform, looking from the back of the model, out onto the platform,
with the train in the background. The ladies Waiting room sign on the
door can be confusing, but when the door is in the closed position, it
would indicate from the platform side, that the ladies waiting room was
in the main building.
To have included the complete station building width in this model,
would have made it too large, so I have just featured the first few feet
of the station. This picture shows the main building entrance to the
platform, looking from the back of the model, out onto the platform,
with the train in the background. The ladies Waiting room sign on the
door can be confusing, but when the door is in the closed position, it
would indicate from the platform side, that the ladies waiting room was
in the main building. |
|
 This airman
figure featured above brings back many memories to me personally. I've sat on many
of these branch line stations myself, usually on L.M.S. lines, in my Royal Air Force
days, back in the early 1950's. I just could not
resist the opportunity to dress this guy up in his best blue uniform.
This airman
figure featured above brings back many memories to me personally. I've sat on many
of these branch line stations myself, usually on L.M.S. lines, in my Royal Air Force
days, back in the early 1950's. I just could not
resist the opportunity to dress this guy up in his best blue uniform. |
 A view from
the outside entrance to the station, showing the wrought iron railings,
with the metal enamel advertising signs. a common sight around that
time. The station lamp also can be seen very clearly in this
picture. Note the Wallingford station name, on the glass lens of the
lamp standard .... not too easy to see!
A view from
the outside entrance to the station, showing the wrought iron railings,
with the metal enamel advertising signs. a common sight around that
time. The station lamp also can be seen very clearly in this
picture. Note the Wallingford station name, on the glass lens of the
lamp standard .... not too easy to see! |
 The engine
driver is about to climb onto the footplate, and a late passenger just
arrives at the station. A porter unloads the daily milk delivery from
the platform trolley, which was accurately reproduced from G.W.R. detailed drawings. The lamp standard by the entrance was built
from metal tube and wire, and depicts the design in detail, of the lamps
that were on the Wallingford station platform at that time. As can be
seen, the lamp standard does light, when the station canopy, and building lights,
are switched on, as they are in this picture. The engine
driver is about to climb onto the footplate, and a late passenger just
arrives at the station. A porter unloads the daily milk delivery from
the platform trolley, which was accurately reproduced from G.W.R. detailed drawings. The lamp standard by the entrance was built
from metal tube and wire, and depicts the design in detail, of the lamps
that were on the Wallingford station platform at that time. As can be
seen, the lamp standard does light, when the station canopy, and building lights,
are switched on, as they are in this picture. |
Photo by W.A.Camwell |
|
Wallingford Station on
the 6th. June 1937 looking towards the buffer stop end of the platform.
A predecessor of my 1400 Class 0-4-2 tank (#4862 Collett) stands
in front of the single road engine shed, and an unknown auto coach
stands at the platform. Picture taken from "Great Western
Branch Line Termini" by Paul Karau. A great publication on early
G.W.R practice. |
|
 A view of
the name board end of the platform, and also the front of our engine,
showing the buffer beam and smoke box front. The white lamp on the
engine also lights when the model is illuminated. What would normally
be the shed number plate on the smoke box door, I have used as a model
number. This is model number 3 of 4 of these engines built. To see
more of the 14xx locomotive, and more of the inside detail of the autocoach
seating etc, visit the
"G.W.R 14xx Auto Train"
page. A view of
the name board end of the platform, and also the front of our engine,
showing the buffer beam and smoke box front. The white lamp on the
engine also lights when the model is illuminated. What would normally
be the shed number plate on the smoke box door, I have used as a model
number. This is model number 3 of 4 of these engines built. To see
more of the 14xx locomotive, and more of the inside detail of the autocoach
seating etc, visit the
"G.W.R 14xx Auto Train"
page. |
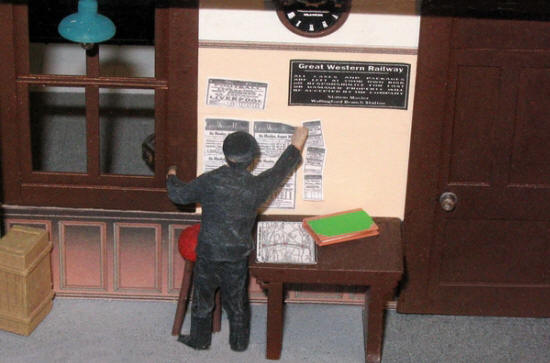 A closer look at the interior of the Left Luggage Office, at the end on
the building, where a railway worker is featured posting the G.W.R
timetable on the wall. Not very clearly shown, is the clock on the
wall, which simulates the design of the special railway clocks of that
time.
A closer look at the interior of the Left Luggage Office, at the end on
the building, where a railway worker is featured posting the G.W.R
timetable on the wall. Not very clearly shown, is the clock on the
wall, which simulates the design of the special railway clocks of that
time. |
 An overview of the buffer stop end of the platform, with an interesting
view of the outside of the Left Luggage office, with the porter loading
the crate. The simulated gray slate roof, rain gutters and down spout
can also be seen in this picture.
An overview of the buffer stop end of the platform, with an interesting
view of the outside of the Left Luggage office, with the porter loading
the crate. The simulated gray slate roof, rain gutters and down spout
can also be seen in this picture. |
 A close shot of the outside of the Left Luggage office, which shows the
wall posters and advertisements in more detail. The notice board can
also be seen on the inside of the office wall.
A close shot of the outside of the Left Luggage office, which shows the
wall posters and advertisements in more detail. The notice board can
also be seen on the inside of the office wall. |
|
 |
 Two track side views which need very little
explanation.
Two track side views which need very little
explanation. |
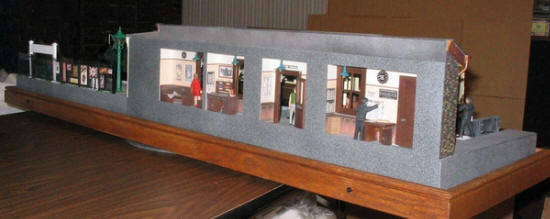
A view from the rear of
the model, showing the four rooms of the station building. At the
extreme left is the Ladies Waiting Room, with a passenger looking our of
the window onto the platform. A discarded newspaper can also be seen
on the wooden seating. Next to that is the Stationmaster's office,
then the main entrance lobby to the platform. On the right is the Left
Luggage office.
In the oak trim can be
seen the small black push buttons for the lights. There is one at each
corner of the model, and when held down .... the lights will come on.
The model is also fitted with a manual turntable in the centre, which
can be seen in this image. This allows one to very easily swing the
model around to view it from any direction. |
|